I’ve been in the competitive gaming scene long enough to know that nothing is more frustrating than sitting down for a session of your favorite game, only to be met with a cryptic error code that bars you from the action. It’s an instant momentum killer. As a writer for RivalsSector, I’m always on the lookout for ways to help my fellow gamers, and a recurring theme in the Marvel Rivals community has been a trio of particularly stubborn login and connection errors: 220, 4, and 10. I’ve spent some time digging into these, and I’ve put together a comprehensive guide to help you get back into the fight and team up with your favorite heroes.
The great thing about many of these common issues is that they’re often tied to network or local system settings that you have direct control over. They might look like a server-side apocalypse, but with a bit of troubleshooting, you can usually sort them out yourself. Let’s break down each one, what it means, and how you can fix it.
Error Code 220: The Server Snub
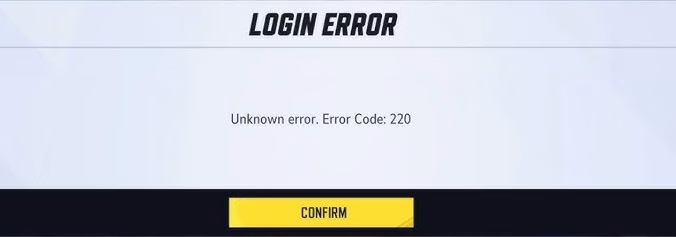
This one’s a classic. You’re trying to log in or join a match, and you’re hit with an “unknown error” and the dreaded code 220. My research indicates that this error is tied to your connection being blocked from the Marvel Rivals servers. This isn’t necessarily a firewall issue on the game’s side, but rather something on your end that’s acting like a bouncer at a club, refusing to let the game’s data through the front door.
The Culprits
- Third-Party Server Blockers or VPNs: If you’ve been using a VPN or a program to change your region for other games, it could be interfering with Marvel Rivals’ connection.
- DNS Settings: Your Domain Name System (DNS) is like the internet’s phonebook, translating website names into IP addresses. Sometimes, a wonky DNS can prevent you from connecting to specific servers.
- Firewall and Antivirus: Your security software might be a little overzealous and mistake the game’s connection attempts for a threat.
How to Fix It
- Disable Third-Party Blockers: The first and most critical step is to temporarily disable any VPNs, game boosters, or server-blocking applications you’re running. A lot of players who had this issue found that this was the magic bullet.
- Adjust Your DNS Settings: This might sound intimidating, but it’s pretty straightforward. You’ll need to go into your network adapter settings and manually change your DNS to a public one, like Google’s (8.8.8.8 and 8.8.4.4) or Cloudflare’s (1.1.1.1 and 1.0.0.1). This can often clear up any routing issues and allow you to connect.
- Check Your Firewall and Antivirus: Make sure that Marvel Rivals is added to the list of exceptions in your firewall and antivirus software. You can test this by temporarily disabling them and seeing if you can connect, but be sure to re-enable them immediately afterward for security.
Error Code 4: The PlayStation Predicament
Error Code 4 is a bit more mysterious. It’s often described as an “unknown error” and seems to disproportionately affect players on PlayStation. This error can pop up when trying to join an online match or even cause sudden disconnections mid-game. It points to a network issue, but one that is often specific to the PlayStation platform or your connection with the PlayStation Network (PSN).
The Culprits
- Network Instability: This is the most common cause. Your internet might be generally fine, but a temporary blip or a weak Wi-Fi signal can be enough to trigger this error.
- PSN Maintenance: While rare, scheduled or unscheduled PSN maintenance can cause this error.
- Platform-Specific Issues: This error could indicate a unique communication problem between the game and the PSN servers.
How to Fix It
- Simple Restart: Sometimes the simplest solution is the best. Start by restarting your router and your PlayStation. This can refresh your connection and clear out any temporary data that’s causing the issue.
- Check PSN Status: Before you get too deep into troubleshooting, check the official PSN status page or Marvel Rivals’ social media channels. If there’s an outage, all you can do is wait it out.
- Clear Console Cache: Consoles, like PCs, can accumulate corrupted cache files. Clearing your PlayStation’s cache might help resolve the issue. You can do this by powering down your console, unplugging it for a minute, and then plugging it back in and restarting.
- Try a Wired Connection: If you’re on Wi-Fi, try connecting your console directly to your router with an Ethernet cable. This eliminates any potential wireless interference.
Error Code 10: The Login Lockout
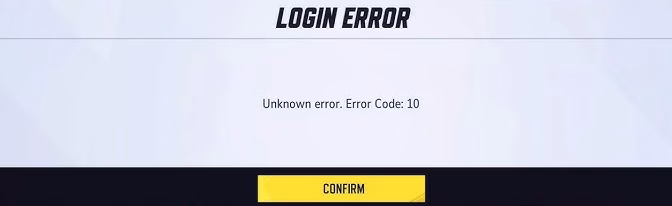
This one is a real pain. Error code 10 often appears as an “Unable to Fetch Account details” message, and it’s a direct login blocker. This error is almost always a network-related issue on the player’s side, often with a clear, albeit sometimes frustrating, fix.
The Culprits
- User Agreement Not Accepted: This is a surprisingly common reason, especially during new updates or early access phases. If the game’s EULA (End User License Agreement) isn’t accepted, you’ll be blocked from logging in.
- Network Bugs: General network glitches, ISP errors, or an unstable connection can cause the game to fail to authenticate your account.
- Launcher Issues: For PC players, the game launcher itself can be the source of the problem. It might not be properly syncing with your account details.
How to Fix It
- Accept the User Agreement: When you launch the game, look for a user agreement or EULA prompt, usually in the top right corner of the screen. Click on it and accept the terms. This has solved the problem for many players.
- Power Cycle Your Network: Just like with the other errors, a simple router and modem restart can work wonders. This flushes out your network’s data and can resolve temporary connection issues.
- Run Command Prompt Commands: If you’re a PC gamer and have some experience, you can use a few command prompt tricks to flush your network cache.
- Open Command Prompt as an administrator.
- Type ipconfig /flushdns and press Enter.
- Type ipconfig /release and press Enter.
- Type ipconfig /renew and press Enter.
- Restart your game and try again.
- Verify Game Files: On PC, your game launcher (Steam, Epic Games, etc.) has an option to verify the integrity of your game files. This checks for any corrupted or missing data that could be causing the issue. I find this to be an essential first step for almost any game-related error.
Troubleshooting Matrix
To make things even easier, I’ve created a simple table to serve as a quick reference for these common errors.
| Error Code | Common Cause | Primary Fix | Secondary Fixes |
| 220 | Connection Blocked, DNS Issues | Disable VPN or Third-Party Blocker | Change DNS, Check Firewall Settings |
| 4 | PSN Network Issues, Instability | Restart Console and Router | Use Wired Connection, Clear Cache |
| 10 | Login and Account Authentication | Accept User Agreement | Restart Router, Use Command Prompt |
A Final Word of Advice
Remember, when you’re troubleshooting any gaming issue, it’s always best to start with the simplest solutions first. A simple restart can save you a lot of headache. Don’t immediately jump to a full reinstall or a system-level change. Work your way up the list of fixes, and in most cases, you’ll be back in the action in no time. If all else fails, checking the official Marvel Rivals social media pages and community forums is a great way to see if others are experiencing the same issue, as it could be a server-side problem that you simply have to wait for the developers to fix.
By following these steps, you’ll be well-equipped to deal with the most frustrating error codes in Marvel Rivals. Now get out there, grab your squad, and show the competition what you’re made of. I’ll see you on the battlefield, hopefully without any hiccups.
Also you can see a step by step guide to fixing the login error in this video. How to Fix Marvel Rivals Login Error Unknown Error Code 220/211/219/202/26/21/10/5 On PC