You are looting a quiet room in the Buried City. You hear a faint hum. Before you can react, a blue flash blinds you. Your character freezes. You cannot run. You cannot aim. You watch helplessly as a rival squad rounds the corner and sends you back to the lobby.
This is the reality of the Jolt Mine meta.
I see too many players ignoring this gadget in favor of standard grenades or the Wolfpack launcher. That is a mistake. The Jolt Mine is currently the most oppressive area-denial tool in ARC Raiders. It does not just damage enemies. It takes away their control. In a game where movement is life, the Jolt Mine is a death sentence.
I am going to show you exactly how to find this blueprint, why it belongs in your loadout, and how to use it to secure more extractions.
Locating the Jolt Mine Blueprint
You cannot craft this item immediately. You must find the blueprint first. Unlike basic gear, you cannot buy this recipe from the vendors in Speranza right away. You have to pull it from the field.
I have found the most success farming for this blueprint in the Buried City. You need to target high-value loot containers. Do not waste time searching loose scrap on the floor. Focus your efforts on these specific containers:
- Weapon Cases: These long, rectangular boxes often sit on tables or shelves in residential apartments.
- Grenade Cylinders: Look for small, tube-like containers often found in armories or security checkpoints.
- Breachable Rooms: The locked rooms in Marano Station are gold mines for blueprints. Bring a Breaching Charge or a gas grenade to clear the room, then loot the secure crates inside.
Once you find the blueprint, your priority shifts. You must extract. If you die with the blueprint in your backpack, you lose it. Treat it like a quest item. Get to an extraction point immediately. Once you are back in Speranza, go to your inventory and “Consume” the blueprint to permanently unlock the recipe at your Explosives Station.
Technical Specifications
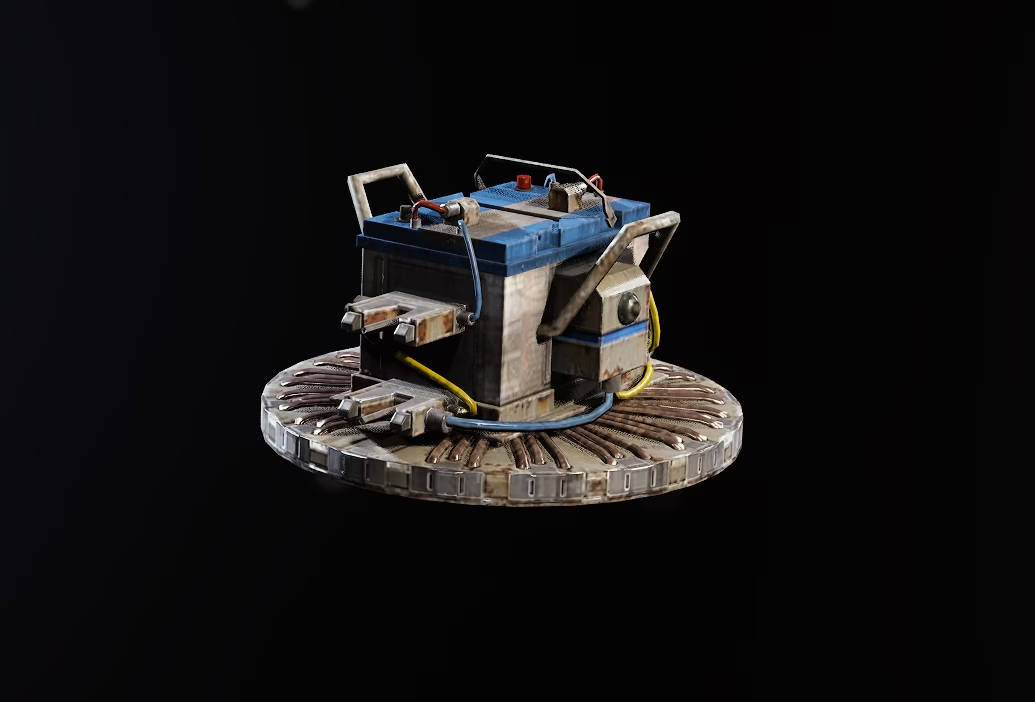
You need to understand the raw numbers to use this tool effectively. The Jolt Mine is not about damage. It is about the stun duration.
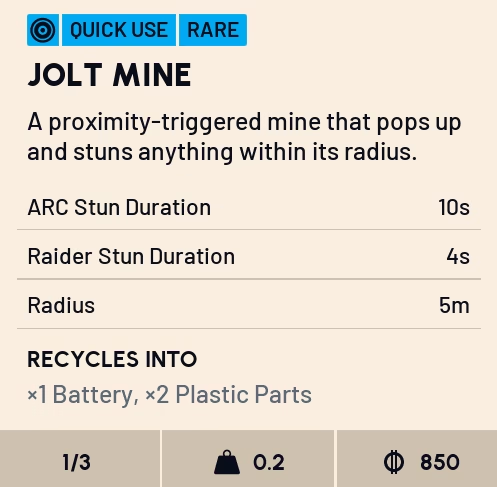
Jolt Mine Statistics
| Stat | Value | Tactical Note |
| Rarity | Rare (Blue) | accessible mid-game |
| Weight | 0.2 | allows for stacking multiple mines |
| Trigger Radius | 5 Meters | covers entire hallways |
| Raider Stun | 4 Seconds | prevents sprinting and aiming |
| ARC Stun | 10 Seconds | disables heavy machine logic |
| Crafting Cost | 1 Electrical Component, 1 Battery | highly efficient |
| Station Level | Explosives Station Lvl 2 | requires upgrade |
The 4-second stun on players is the critical stat here. In a firefight, four seconds is an eternity. You can reload, heal, or reposition while your enemy stands still.
Combat Application and Strategies
If you place a Jolt Mine in the middle of an open floor, you fail. Competent players will see the blue glow and shoot it. You must be deceptive. I use these specific placements to catch even the most veteran Raiders.
The Ceiling Trap
Players rarely look up. Most Raiders scan the ground for loot and traps. I place my Jolt Mines on the ceiling directly above doorways. As the enemy team pushes through the door, they trigger the mine before they even enter the room. They get stunned in the fatal funnel of the doorway, blocking their teammates and giving you an easy multi-kill.
The Loot Honey Pot
Greed kills more Raiders than bullets. Drop a valuable item, like a pristine weapon or a stack of electronics, in a visible spot. Place a Jolt Mine underneath the loot or hidden in the debris right next to it. When a player runs over to check the item, they trigger the trap. This works exceptionally well in the dark tunnels of the subway.
The Aggressive Retreat
You can use the Jolt Mine offensively. If a squad chases you, break their line of sight around a corner. Immediately drop a mine at your feet and keep running. The lead pursuer will sprint around the corner to catch you and run straight into the stun. This separates the enemy team and lets you turn the fight into a 1v1.
The Zipline Ambush
Ziplines are death traps. Players have zero control while riding them. Place a mine at the very top of a zipline exit. The moment the player dismounts, the animation locks them in place, and the mine triggers. They drop onto the roof stunned and defenseless.
Comparison to Other Gear
Many players ask me if they should run the Jolt Mine over a grenade. If you check any ARC Raiders best equipment guide, you will see that raw damage explosives like the Frag Grenade fall off in the late game. High-level players have thick shields that absorb explosive damage.
The Jolt Mine bypasses this issue. It does not care about their shield rating. It cares about their mobility. A stunned player with a purple shield dies just as fast as a stunned player with a white shield because they cannot fight back.
Countering the Trap
You will eventually face a Jolt Mine. You need to know how to survive.
- Listen for the Hum: The mine emits a low-frequency electric buzzing sound. If you hear this near a door, stop.
- Look for the Blue Pulse: In dark areas, the mine pulses with a blue light every few seconds.
- Shoot to Disarm: Do not try to walk up and interact with it. The trigger radius is larger than the interaction range. You will stun yourself. Shoot the mine from a distance to destroy it safely.
- Use Decoys: If you suspect a room is trapped, throw a smoke grenade or a decoy into the entry. The physical object passing through the radius will often trigger the mine, clearing the path for you.
Conclusion
The Jolt Mine is the great equalizer. It allows a solo player to dismantle a full squad and gives teams the power to lock down entire buildings. Stop selling your batteries. Start crafting mines. The Buried City is a dangerous place, and you need every advantage you can get.
Do you have a favorite dirty spot for placing mines? Tell me your strategies in the comments.For more deep dives into loadouts and survival tactics, make sure to browse our ARC Raiders category.