Hello Raiders, Elias here from Rivalsector.com.
In the brutal, unforgiving world of ARC Raiders, your loadout is your life. Every run is a gamble, and the gear you carry is the only thing tipping the odds in your favor. We all have our favorite weapons, but every so often, a piece of hardware comes along that just defines the meta and rockets to the top of every ARC Raiders weapon tier list.
Right now, that gun is the Anvil.
This is not just another sidearm. This Uncommon-rarity hand cannon is, without a doubt, the S-tier king of the Dam Battlegrounds, and for good reason. It is a pocket sniper, an armor-crushing monster, and the great equalizer in both PvP and PvE.
But what makes it so good? Where can you find the coveted blueprint to craft your own? And how do you use it without getting yourself killed? I have been running the Anvil on almost every raid, and today, I am giving you the full breakdown.
What Makes the Anvil S-Tier?
On paper, the Anvil is an “Uncommon” Hand Cannon. But in practice, it punches way, way above its weight class. Its power comes from a perfect storm of three key factors:
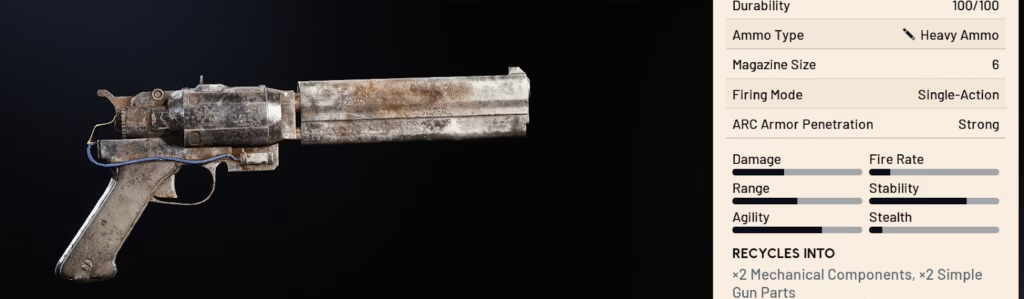
- Raw Stopping Power: The Anvil uses Heavy Ammo, and it hits like a freight train. It has a base damage of 40, which is devastating. This is the kind of weapon that rewards precision with massive damage spikes. Against enemy Raiders, a well-placed headshot is a fight-ender.
- The ARC Killer: This is where the Anvil truly shines. Its heavy rounds have “Strong” armor penetration, making it one of the most effective tools in the game for shattering ARC armor plating. While your squadmates might be dumping full AR mags into a Grunt, you can calmly place two or three Anvil shots and crack it wide open. It turns heavily armored threats into scrap metal.
- The “Pocket Ferro”: Many players love the Ferro break-action rifle for its high-damage heavy rounds. The Anvil delivers similar stopping power but with a 6-round cylinder. This is a massive upgrade. Instead of having to reload after every single shot, you have six chances to end a fight. This makes it infinitely more forgiving and versatile than its single-shot cousins.
Of course, it is not perfect. It is a single-action weapon with slow handling, a slow reload, and a kick you need to manage. This is not a run-and-gun SMG. It is a deliberate, precise weapon for players who know how to time their shots.
Finding the Anvil Blueprint: The 5,000 Coin Question
Seeing an Anvil in the shop is a treat, but true self-sufficiency comes from crafting. To do that, you need the Anvil blueprint. This is one of the most sought-after items in the game, and finding one is a moment of pure triumph.
Like all blueprints, the Anvil is a random drop, so there is no single guaranteed location. However, you can seriously improve your odds by focusing on high-tier loot containers.
Here are the best places I, and the community, have had luck finding blueprints:
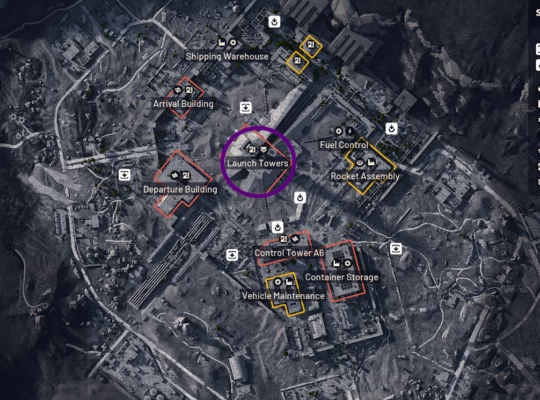
- High-Value Caches: These are the hidden stashes scattered across the map. One of the most famous and consistent locations is a “raider cache” on the Dam Battlegrounds. You can find it in a gap under the raised, broken highway, in the area between Raider Outpost East and the East Broken Bridge.
- Keycard Rooms: That Purple Control Tower Keycard I have talked about before? The loot room it opens is a prime spot for blueprint hunting.
- Weapon Crates: The same crates you farm for guns can also contain blueprints.
- Red Lockers: I have had squadmates swear they found theirs in the red lockers you find in high-traffic military zones.
Once you find the blueprint, you must successfully extract with it. If you die, you drop it. As soon as you get back to your Speranza hub, go into your inventory, select the blueprint, and choose “Learn and Consume”. This permanently unlocks the recipe for you.
From Anvil I to Anvil IV: The Real S-Tier Strategy
Finding the blueprint is just the first step. A base-level Anvil I is good, but a fully upgraded Anvil IV is a completely different monster. The upgrade path is, in my opinion, the real secret to this gun’s power.
To craft the Anvil I, you need your Gunsmith bench at Level 2 and a handful of materials (usually 5x Mechanical Components and 5-6x Simple Gun Parts).
But check out this upgrade path. The main benefit you get from upgrading is not damage, it is fire rate.
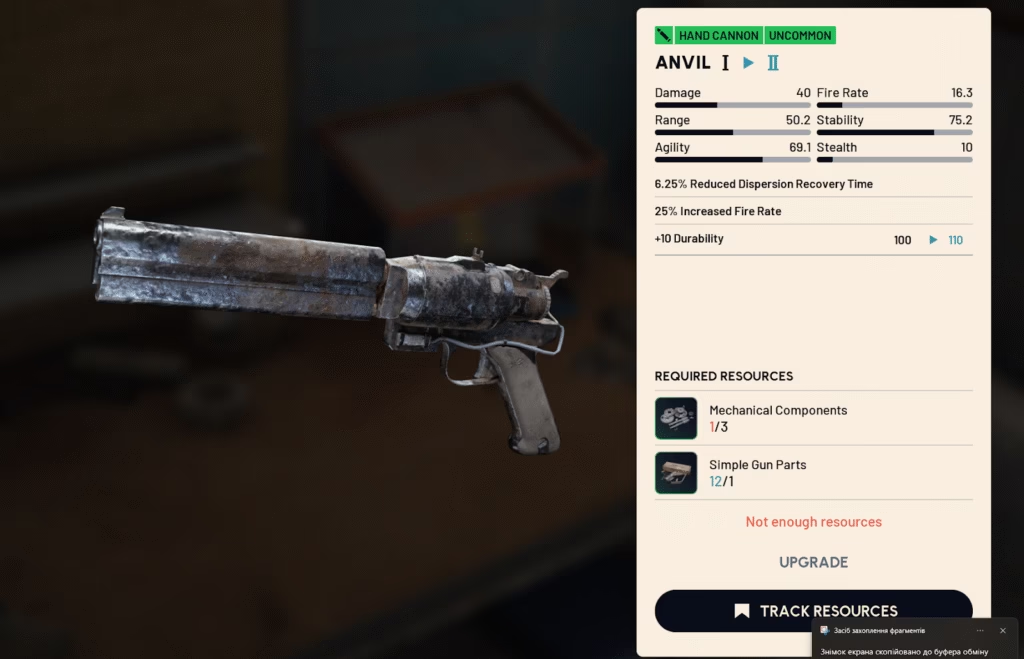
| Upgrade Path | Requirements (at Gunsmith 1) | Key Benefits |
| Anvil I to Anvil II | Anvil I + 3x Mech Components + 1x Simple Gun Parts | +25% Fire Rate, Faster Dispersion Recovery |
| Anvil II to Anvil III | Anvil II + 4x Mech Components + 1x Heavy Gun Parts | +50% Fire Rate (total), Faster Dispersion Recovery |
| Anvil III to Anvil IV | Anvil III + 4x Mech Components + 1x Heavy Gun Parts | +75% Fire Rate (total), Faster Dispersion Recovery |
A 75% increase in fire rate is game-changing. One community member even noted it “basically triples the fire rate” from their experience. This upgrade transforms the Anvil from a slow, heavy-hitting cannon into a responsive, terrifyingly lethal weapon that can drop targets with rapid, devastating follow-up shots. This is your number one priority after learning the blueprint.
How to Dominate with the Anvil: Strategies and Loadouts
Okay, you have your shiny new Anvil. How do you use it? I run two primary playstyles with this gun, and both are incredibly effective.
Strategy 1: The Mid-Range Marksman
This is the Anvil’s bread and butter. You are not a front-line breacher. You are the mid-range support who changes the entire dynamic of a fight.
- Playstyle: Stick to cover. Your job is to peek, land one or two massive shots, and get back into cover. You are aiming for heads and armored components. Let your teammates with automatic weapons apply pressure while you provide the surgical, fight-ending damage.
- Target Priority: Your first targets are always enemy Raiders (aim for the head) or heavy ARC units (aim for armor plates). You can one-shot or two-shot enemies that other guns struggle with.
- Loadout Pairing: Since the Anvil is for precision, you need a partner weapon for “oh crap” moments. The Rattler SMG is a perfect companion. It is a full-auto “get off me” tool that covers your weakness at close range. For a budget-friendly, high-power build, you can even pair it with a Ferro. Use the Ferro for your first long-range shot, then swap to the Anvil for the 6-shot follow-up.
Strategy 2: The “Splitter” Brawler
This strategy revolves around a specific Tech Mod: the Anvil Splitter. This attachment is a separate blueprint you need to find, but it fundamentally changes the gun.
- Playstyle: The Splitter mod “splits the projectile in 4,” effectively turning your hand cannon into a high-powered, long-range shotgun. This makes it a monster at close-to-medium range. You can be more aggressive, pushing buildings and holding tight corners.
- Target Priority: Anyone dumb enough to get close to you. This build melts Raiders at close range and still shreds ARC armor.
- Loadout Pairing: With the Splitter, the Anvil becomes your primary CQC weapon. You can pair this with a long-range battle rifle or sniper, like the Renegade or Osprey, to cover extreme distances.
The Verdict
The Anvil is the total package. It is a high-skill, high-reward weapon that dominates the mid-range, melts the toughest enemies in the game, and scales incredibly well with upgrades. It is the definition of an S-tier weapon, and learning to use it will elevate your game.
So, get out there and start farming those hidden caches. That blueprint is waiting for you.
This is Elias, signing off for Rivalsector.com. For more in-depth weapon guides, raid strategies, and everything else ARC Raiders, be sure to check out our ARC Raiders category.
What is your favorite Anvil loadout? And where did you find your blueprint? Let me know in the comments below. I will see you on the surface, Raider.