What’s up, Raiders? Elias here from Rivalsector.com. I’ve been living on the new Stella Montis map since it launched. I’ve run zero-to-hero kits, lost Chad loadouts to rats, and filled my stash to bursting. After dozens and dozens of raids, I’ve drilled down to the absolute best, most “broken” Points of Interest (POIs) this CQC labyrinth has to offer.
Stella Montis is not like other maps. It’s a dense, two-level station where a shotgun and a Jolt Mine are your best friends. The loot is hyper-condensed, but it’s also high-risk. You can’t just run in blind. You need a plan.
This is that plan. I’m counting down my top 10 loot locations on Stella Montis. These are the rooms that will make you rich, fund your kits, and give you a massive advantage. Let’s get into it.
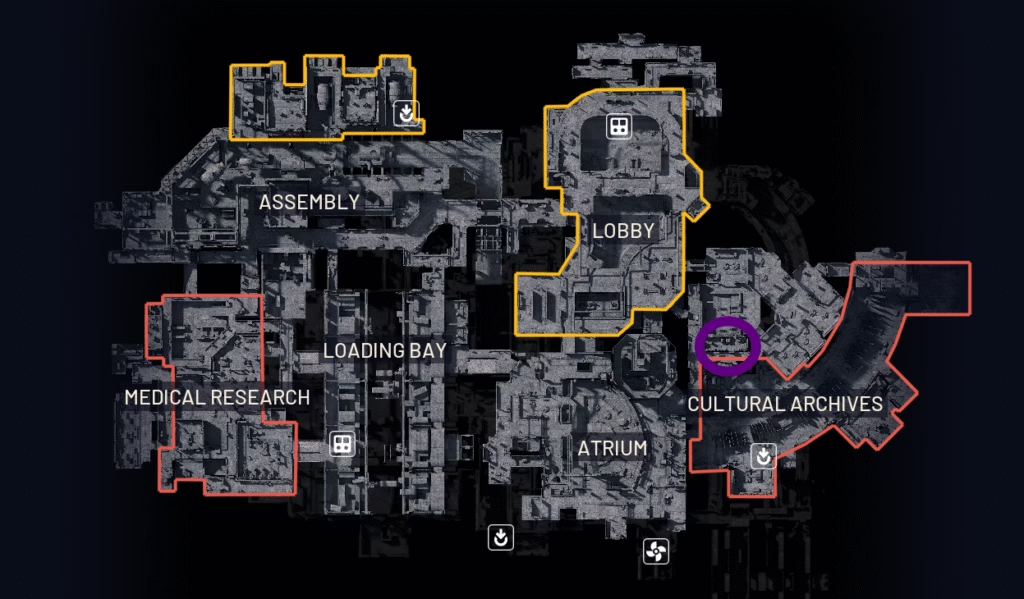
#10. Cultural Archives
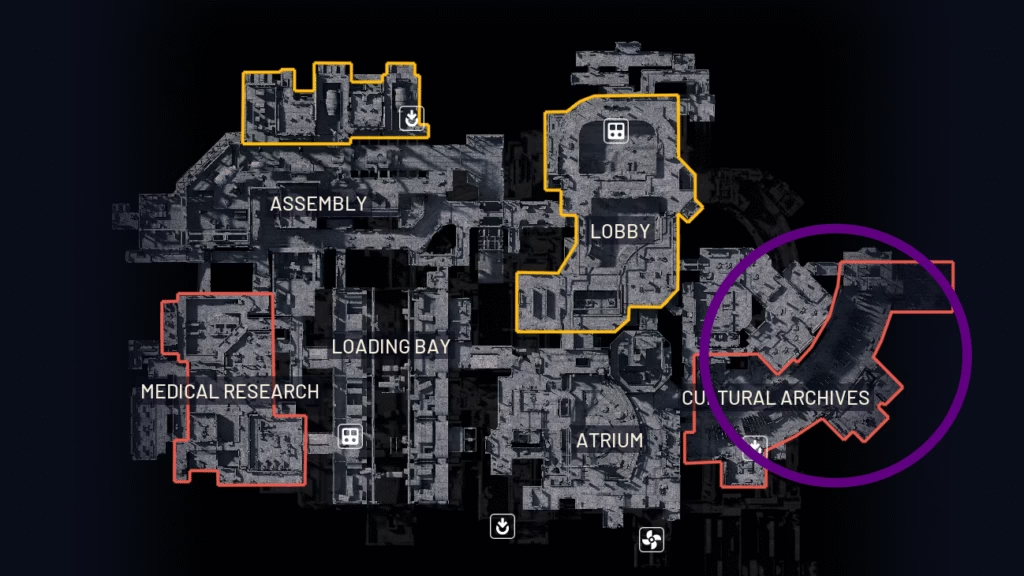
- Location: Upper Level (Floor 2), Southeast
- Why It’s Great: This spot is for pure, raw value. The Archives are packed with warehouse boxes and old-world loot, which is basically just commercial loot. This means you will find a massive quantity of valuables to sell for cash. If you just need to fill your bag with items that stack high and sell for a lot, this is a fantastic place to start your run. It’s relatively low-key compared to other spots, but it’s full of Ticks, so don’t go in completely deaf.
#9. Security Checkpoint
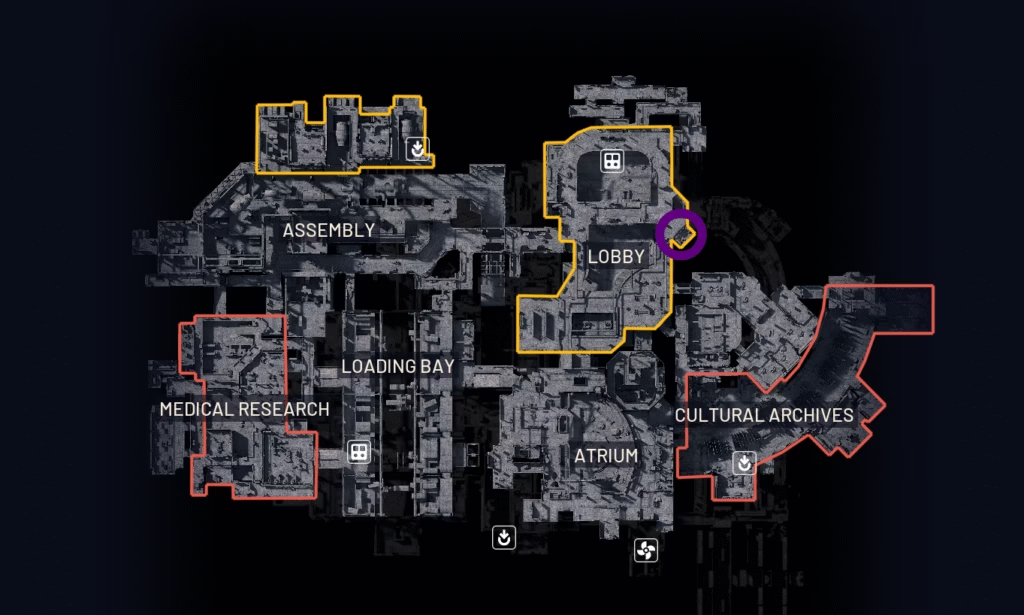
- Location: Upper Level (Floor 2), Main Lobby (East Side)
- Why It’s Great: This room is pure, high-tier locked loot. Now, you might have heard about a bug that lets players phase through the door. I expect that to be patched immediately, if it hasn’t been already, so I’m not relying on that. The reason it’s on this list is that even as a high-value, high-traffic spot, it contains security and tech loot that is well worth fighting for. Being right in the Main Lobby, however, means you need to clear your corners. Someone is always watching this room.
#8. Auditorium Server Room
- Location: Upper Level (Floor 2), South (in the Auditorium/Business Lounge)
- Why It’s Great: This is one of my favorite “sleeper” spots. While the main Atorium and Business Lounge are good for Exodus loot, there is a specific, small server room on the southern side of the Atorium that is just chef’s kiss. It is wall-to-wall server stacks that you can breach for a massive, condensed injection of tech loot. This is where you go for processors, wires, and batteries. The catch? You are a sitting duck. It’s a small room, and breaching is loud. Place a Jolt Mine at the door before you start.
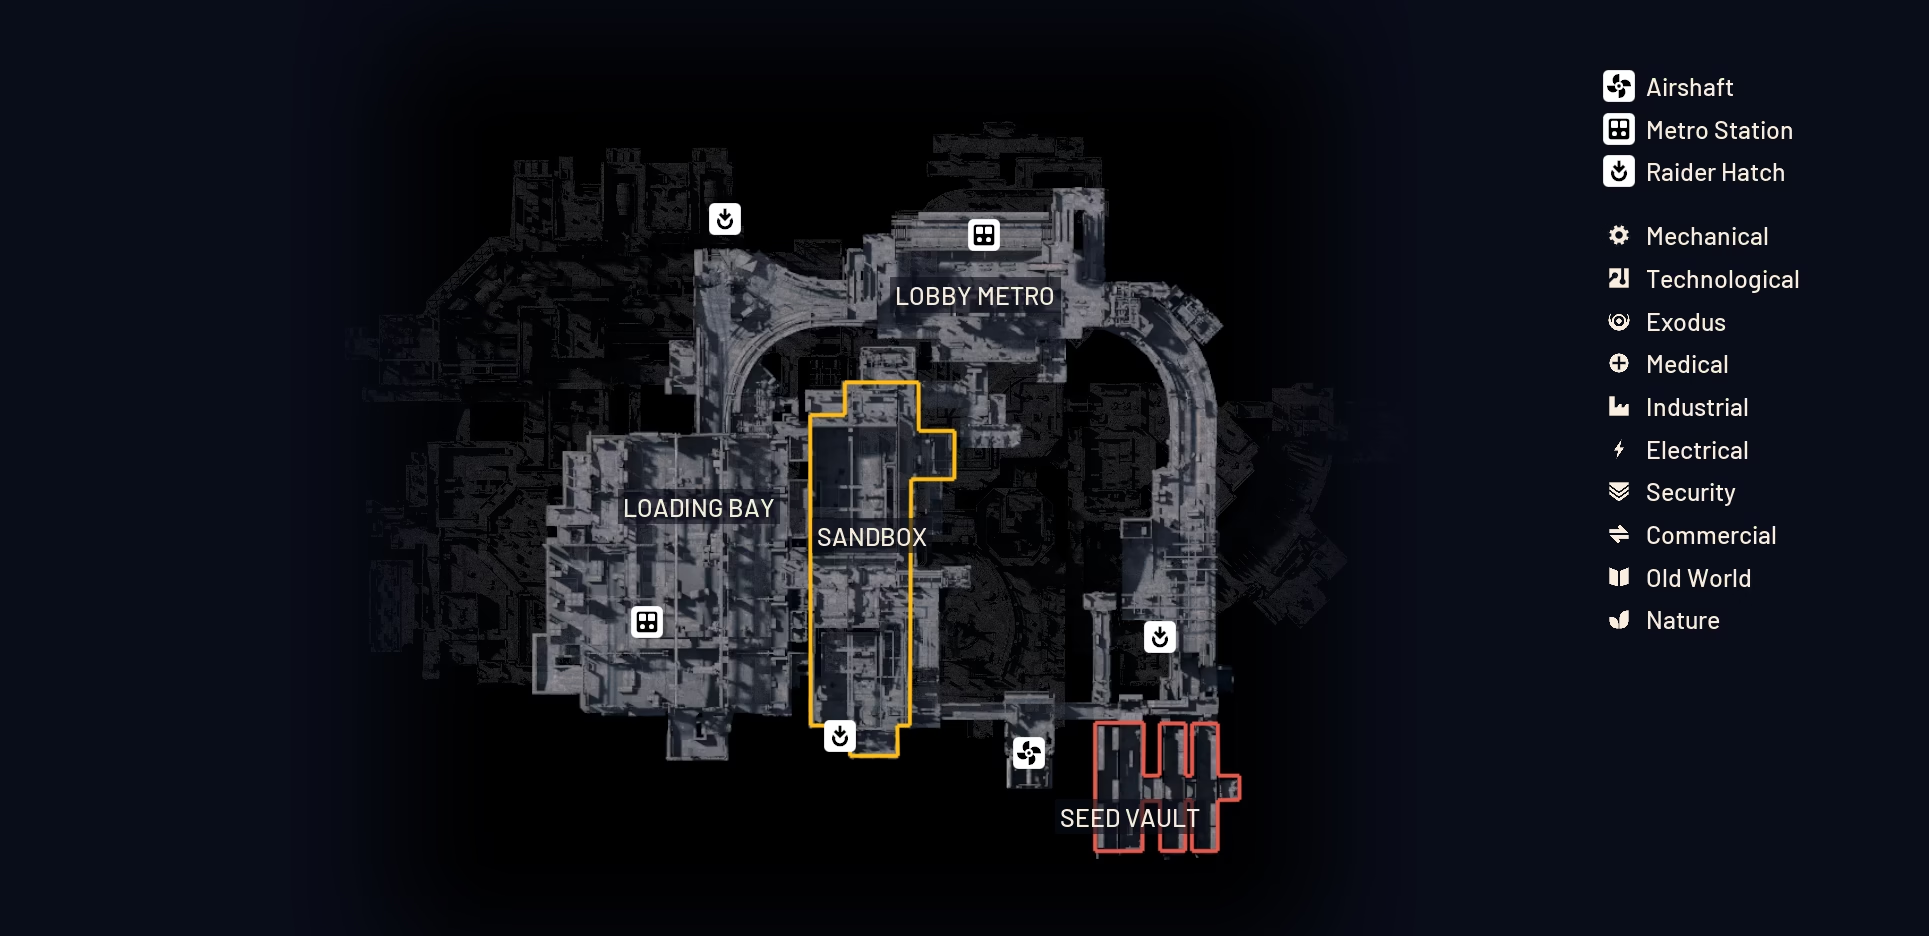
#7. Seed Vault
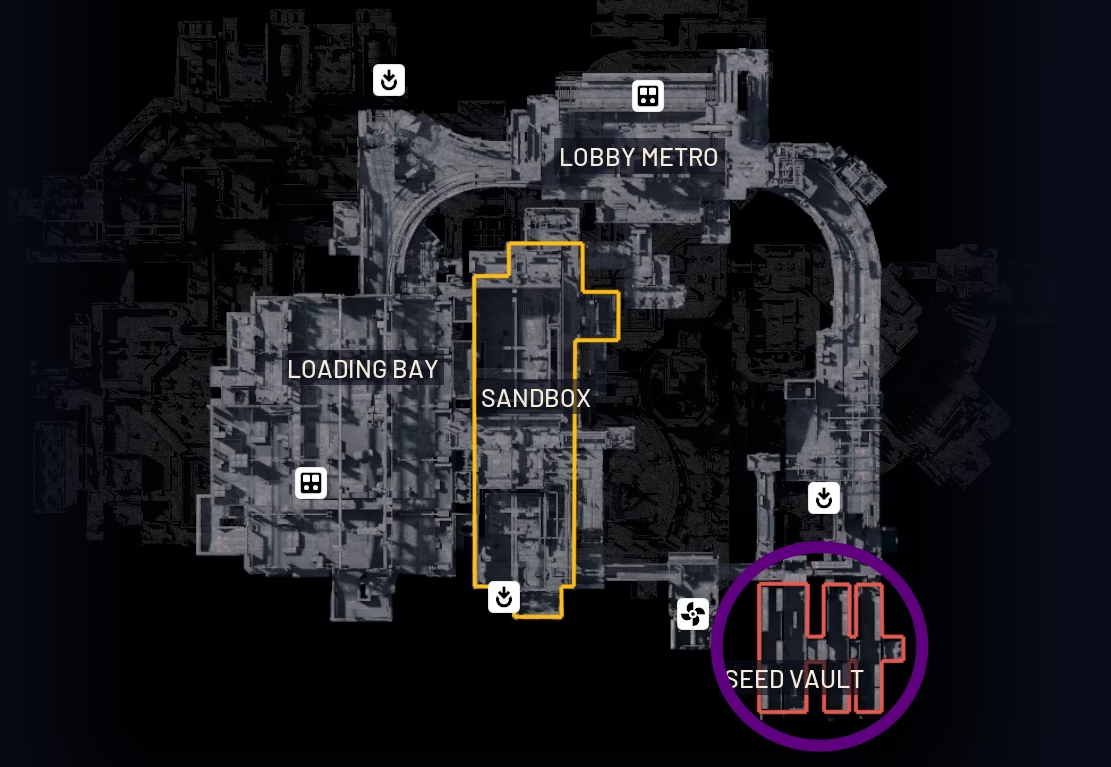
- Location: Lower Level (Floor 1), Southeast
- Why It’s Great: This is our first major puzzle room on the list. The vault is locked and requires one Fuel Cell to open. You can almost always find the cell in the adjacent Seed Vault Air Shaft (which is also an extract). Inside, you’ll find a ton of seeds (great for trading or selling), textile loot, and more servers. It’s a great haul, but be ready for a fight. The vault is infested with Ticks that swarm you the second the door opens.
#6. Assembly Workshops
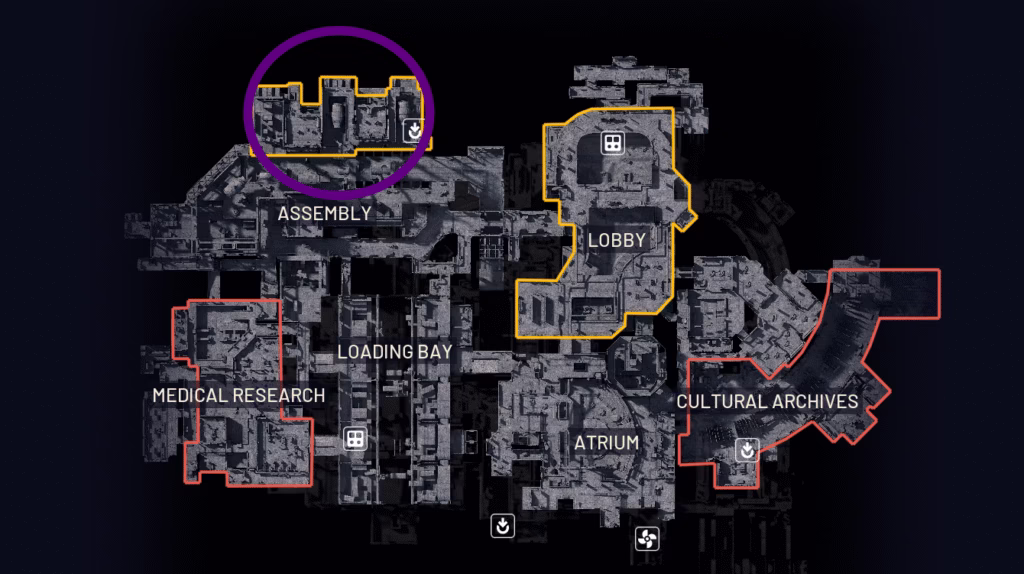
- Location: Upper Level (Floor 2), Northwest
- Why It’s Great: This spot is all about speed and efficiency. The two workshop rooms are loaded with quick-search containers and breach-able tech loot. This is my go-to spot for the Flow Controller and Magnetron quest items. But its real value is the “speedrun” route. You can spawn at the nearby assembly line, loot both workshops top to bottom, and be at the Assembly Hatch extract in under five minutes for a 100-200k value run. It’s fast, it’s profitable, and it’s one of the best ways to warm up.
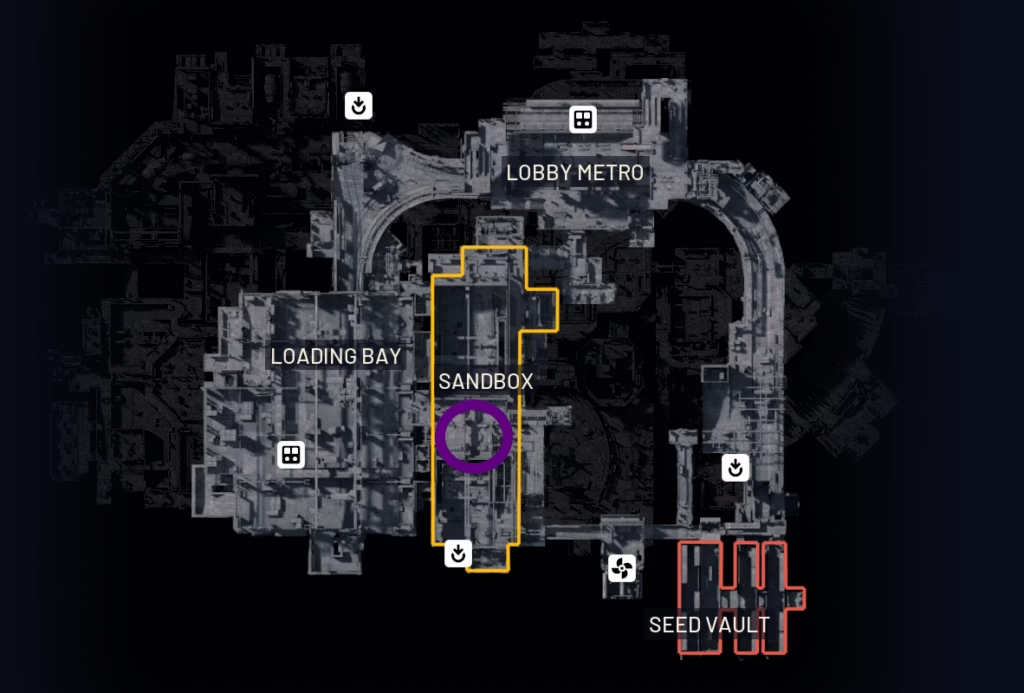
#5. Locked Store Room (Sandbox)
- Location: Lower Level (Floor 1), Central
- Why It’s Great: This is the map’s big puzzle room, and the loot inside proves it. North of the Robotic Sandbox, you’ll find this locked door. To open it, you need to find three Power Cells and insert them into the wall panel. These cells are on a charging rack in the Sandbox A area, to the southwest. This is a real pain to do solo, as you have to ferry them one by one, completely exposed. But if you pull it off, the room rewards you with tons of warehouse loot, high-end tech, and a security breach terminal.
#4. Cafeteria (Locked Storage)
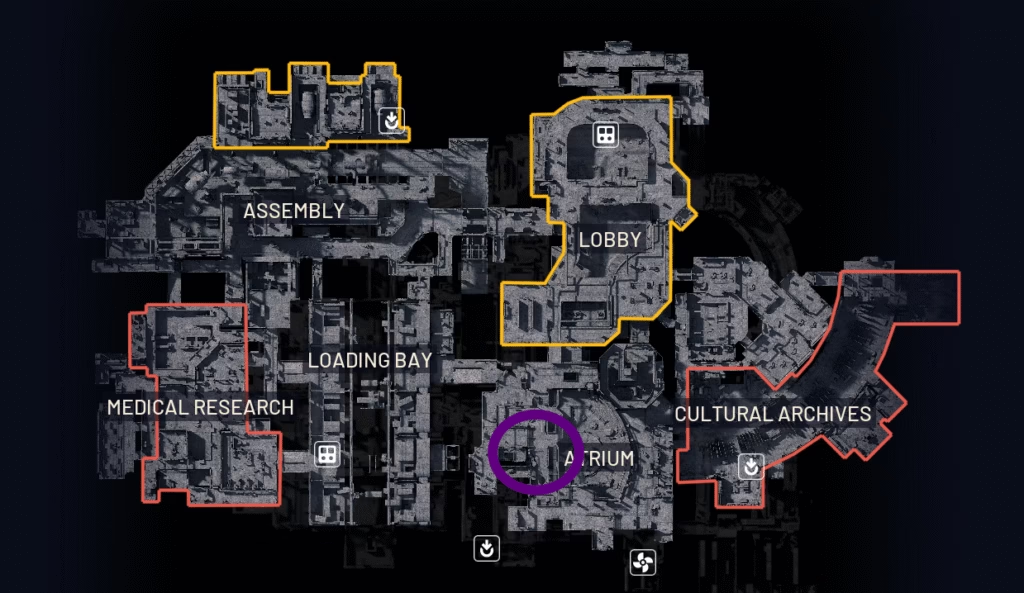
- Location: Upper Level (Floor 2), Central (in the Atrium)
- Why It’s Great: Never underestimate a cafeteria. The real prize here is the locked storage unit in the back kitchen. This room requires one Fuel Cell to open. The Fuel Cell is always on the Atrium’s ground floor, usually near the central monument or the broken stairs. This is one of the most profitable rooms in the game. Inside, you’ll find Raider Cash and multiple fruit basket spawns. It’s like a mini-Lush Blooms run, condensed into one room. It’s an incredible, fast money-maker.
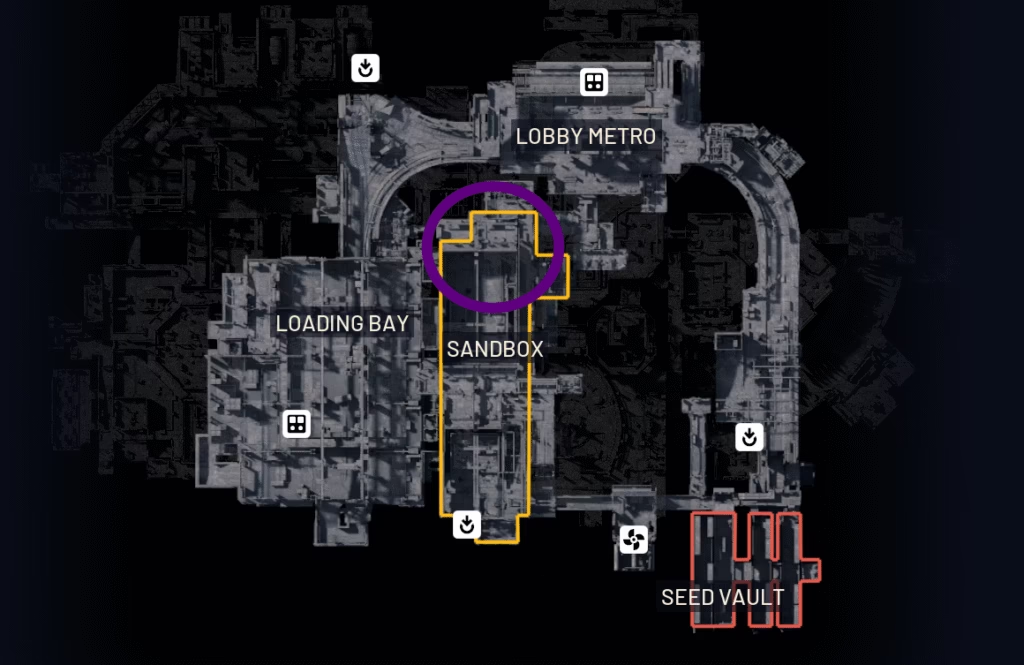
#3. Control Room
- Location: Lower Level (Floor 1), Central (above the Sandbox)
- Why It’s Great: Do you run blue shields? Do you hate crafting batteries? Then welcome home. The Control Room is the uncontested battery farm on Stella Montis. The server stacks in these two rooms have a ludicrously high spawn rate for batteries. I am talking about finding 10 to 15 batteries in a single loot container. You can fill your bag with batteries in one run and never think about them again. It’s also full of wires and processors. This spot is absolutely essential.
#2. Staff Room
- Location: Upper Level (Floor 2), West (near Cargo Dock B)
- Why It’s Great: This tiny, unassuming room might just be the best “raw value” spot in the game. Tucked away in a connector hallway, this Staff Room contains wall-to-wall red lockers. If you get to this room first and unlooted, you will walk out with a bag so full of high-value commercial loot that you’ll be overweight. It’s almost unbelievable. It also has a security breach terminal. Because it’s so good, and so small, it’s a very popular spot for “rats” to camp. Have your shotgun out and check your corners.
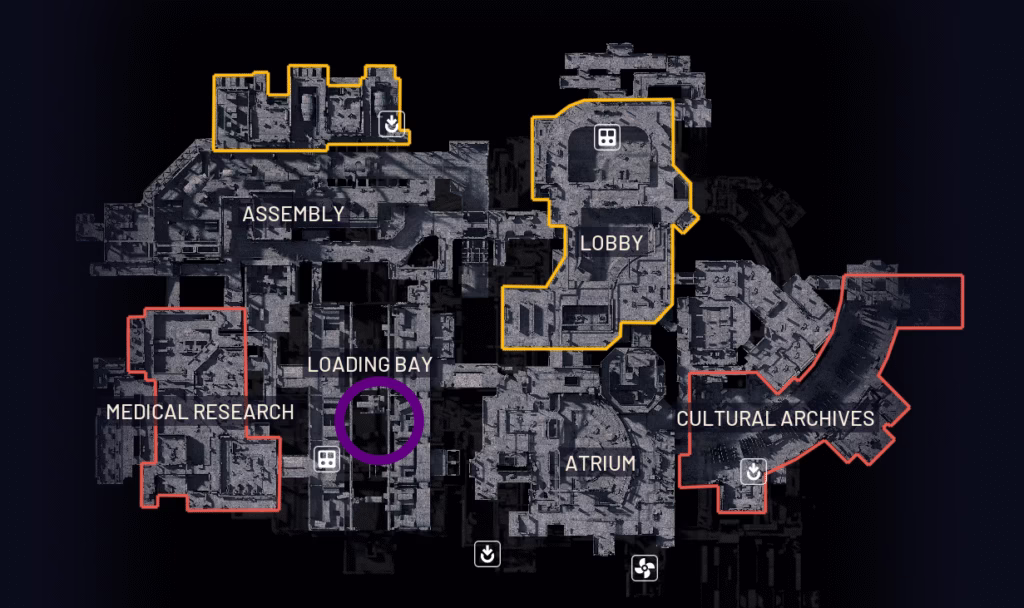
#1. Medical Research
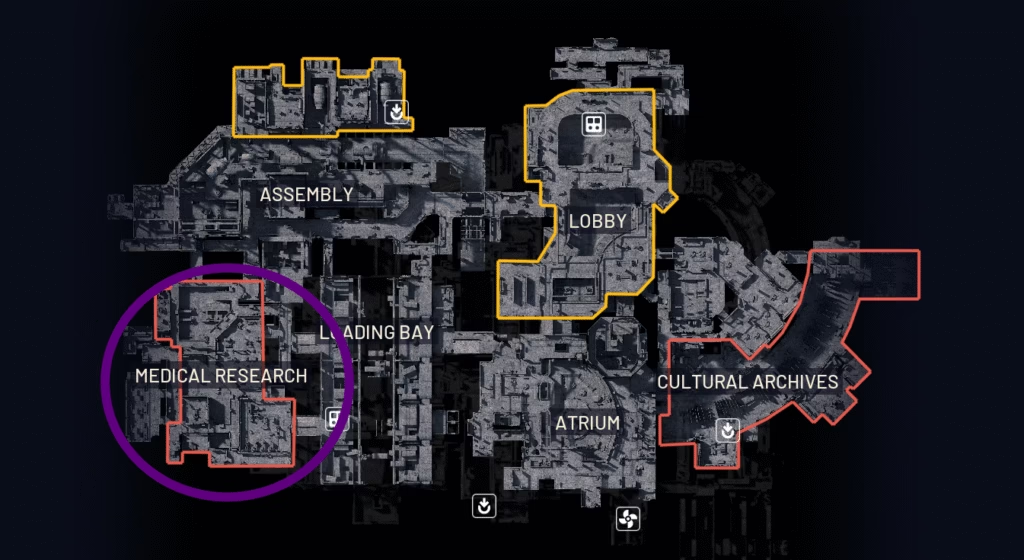
- Location: Upper Level (Floor 2), West
- Why It’s Great: This is it. The single most “broken” POI in Stella Montis. This red-value location is an infinite Showstopper farm. The sheer density of medical containers, dead robots, and shelves spawns an absurd amount of high-tier medical loot and, most importantly, Voltage Converters. You can easily find enough components for 20 or 30 Showstoppers in a single pass. You’ll also find other purple-tier items like Ion Splitters and Spectrum Analyzers.
This room is the definition of high-risk, high-reward. It is arguably the most populated place on the map. You will get into a fight here. But if you win, you will be kitted out for your next ten raids. This is, hands down, the best loot location on the map and a must-hit if you’re looking for the best gear. It’s the new king, and it’s not even close.
Stella Montis: Risk vs. Reward
This map is all about making smart choices. Here’s a quick table to help you decide where to go.
| POI (My Rank) | Primary Loot | Risk Factor | Why It’s Worth It |
| #1 Medical Research | Showstoppers, Augments | EXTREME | The best components in the game. |
| #2 Staff Room | Commercial (Cash) | HIGH | Insane, condensed raw value. |
| #3 Control Room | Batteries, Tech | HIGH | The “infinite” battery farm. |
| #4 Cafeteria | Fruit Baskets (Cash) | MEDIUM | Puzzle room for fast cash. |
| #5 Locked Store Room | Tech, Warehouse | MEDIUM | 3-cell puzzle with great tech. |
| #6 Assembly Workshops | Tech, Quest Items | MEDIUM | The perfect “speedrun” route. |
| #7 Seed Vault | Seeds, Textiles | MEDIUM | 1-cell puzzle for good value. |
| #8 Atorium Server Room | Tech | HIGH | Very condensed tech loot. |
| #9 Security Checkpoint | Security, Tech | HIGH | High-tier loot in a hot zone. |
| #10 Cultural Archives | Commercial (Cash) | LOW | Easy, safe loot to fill your bags. |
My Final Pro-Tips for Stella Montis
After all my runs, this is what I’ve learned. These tips will keep you alive.
- USE JOLT MINES: I can’t say this enough. On a CQC map, they are your best offense and defense. When you breach a loud room like Medical or the Control Room, throw a Jolt Mine at the door. It will save your life.
- Use Barricade Kits: Many rooms have doors that are stuck open. Use a barricade to create your own cover and block a sightline.
- Master the Shredder: The new ARK is terrifying. Do not face-tank its shrapnel. Break line of sight to stop the damage, then peek and shoot the glowing blue jets at its base.
- Learn the Puzzles: Always be on the lookout for Fuel Cells (for the Cafeteria and Seed Vault) and the three Power Cells (for the Sandbox Locked Store Room). These rooms are a core part of an ARC Raiders Loot Locations Tier List and are too valuable to skip.
- Bring a Shotgun: Even if you run an AR or SMG, having a shotgun as your secondary for clearing corners is a non-negotiable meta-call.
Conclusion
Stella Montis has completely changed the game. It’s a fast, brutal, and incredibly rewarding map that tests your CQC skills and map knowledge. These 10 POIs are your ticket to a full stash and decked-out kits. Learn the routes, know the puzzle solutions, and most importantly, check your corners.
What do you think of my list? Did I miss a sleeper spot that you’ve been farming? Let me know in the comments. I’m always looking for a new edge. For more deep-dive guides like this, be sure to check out our ARC Raiders category here at Rivalsector.com.
Now, if you’ll excuse me, I hear a breach in Medical Research. I’ve got to go.